Training Deep Models for Denoising
Image denoising, in which a noisy image is the input and an image with noise reduced is the output, has always been a central challenge in image processing. Although traditional techniques cannot fully recover noised out pixels of the source image, Dragonfly's Deep Learning approach can accurately distinguish between real image detail and noise. This allows you to remove noise while actually recovering image detail.
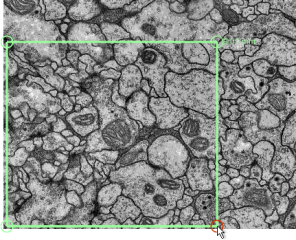
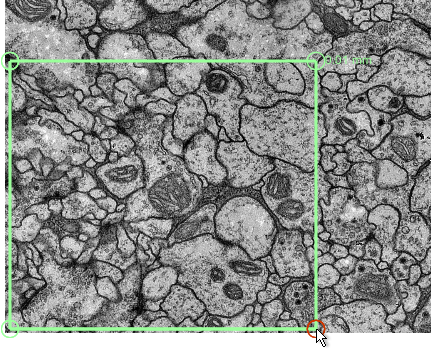
Original image (left) and denoised with Noise2Noise_SRResNet model (right)

Acknowledgments: Sample courtesy of Dr Xuejun Sun, University of Alberta, Cross Cancer Institute. Imaged by Rachan Parwani on a ZEISS GeminiSEM 300.
The video below provides an overview for training Deep Models for denoising.
Denoising with Deep Learning (49:29)
You also view this video and others in the Recorded Webinars section on our website (https://www.theobjects.com/dragonfly/learn-recorded-webinars.html).
The following topics are discussed in the video. Links to Help topics with further information are also provided.
- System requirements for Deep Learning (go to www.theobjects.com/dragonfly/deep-learning-requirements.html).
- Extracting training data from marked slices (see Extracting New Images from Marked Slices).
- Generating Deep Models for denoising (see Generating Models for Denoising).
- Selecting the inputs and setting the training parameters (see Model Training Panel).
- Training denoising models (see Training Denoising Models).
- Previewing training results (see Previewing Training Results).
- Questions and answers.
The following items are required for training a Deep Learning model for denoising:
- Training data, which includes input and output images (see Denoising Strategies for information about pairing inputs with outputs).
You should note that you can extract training data as a subset of the original data (see Extracting New Images from Marked Slices).
- A model that supports denoising.
A selection of untrained models suitable for regression are supplied with the Deep Learning Tool (see Deep Learning Architectures). You can also download models from the Infinite Toolbox (see Infinite Toolbox), or import models from Keras.
The following items are optional for training a Deep Learning model for denoising:
- An ROI mask(s), for defining the working space for the model (see Applying Masks).
- A visual feedback region for monitoring the progress of training (see Training Deep Models for Denoising).
You use different strategies for denoising by pairing different inputs to outputs and to then train a Deep Model to predict the original without noise. These include pairing a high-noise input with a low-noise output, a high-noise input with a hIgh-noise output, or a source image with noise to a source image with noise.
High-Noise/Low-Noise… In this intuitive approach, a high-noise input image is paired with a low-noise output image to train a model. Data can be acquired experimentally by capturing short-duration and long-duration images or by creating synthetic low-noise images through image filtering (see Smoothing Filters).
High-Noise/High-Noise… This approach takes advantage of the fact that neural networks are not good at reproducing noise. In this case, a high-noise image provides both the input and output.
Noise-to-Noise…Here, a source image with added noise is paired with another version of the source image with added noise. In this case, the signal common to both the input and output images will be extracted with moderate iterations. You should note Dragonfly provides an additive noise filter for adding noise to images.
To help monitor and evaluate the progress of training Deep Learning models, you can designate a 2D rectangular region for visual feedback. With the Visual Feedback option selected, the model’s inference will be displayed in the Training dialog in real time as each epoch is completed, as shown on the right of the screen capture below. In addition, you can create a checkpoint cache so that you can save a copy of the model at a selected checkpoint (see Enabling Checkpoint Caches and Loading and Saving Model Checkpoints). Saved checkpoints are marked in bold on the plotted graph, as shown below.
Training dialog

- Scroll to a representative slice within your input dataset.
- With the Rectangle tool that is available on the Annotate panel, add a 2D rectangular region that includes the area you want to monitor during training (see Using the Region Tools).
Note Any region that you define for visual feedback should not overlap the training data.
- Choose the required region in the Visual feedback drop-down menu on the Inputs tab.

Note The visual feedback image for each epoch is saved during model training. You can review the result of each epoch by scrolling through the plotted graph. If the checkpoint cache is enabled, you can also save the model at a selected checkpoint when you review the training results (see Loading and Saving Model Checkpoints).
Dragonfly's Deep Learning Tool provides a number of architectures — including Autoencoder, Noise2Noise, Noise2Noise_SRResNet, U-Net, U-Net 3D, and U-Net++ — that are suitable for denoising tasks.
- Choose Artificial Intelligence > Deep Learning Tool on the menu bar.
The Deep Learning Tool dialog appears.
- On the Model Overview panel, click the New button on the top-right.
The Model Generator dialog appears (see Model Generator for additional information about the dialog).
- Make sure that only Denoising is checked for the Show architectures for options.
This will filter the available architectures to those recommended for denoising.
- Choose the required architecture in the Architecture drop-down menu.
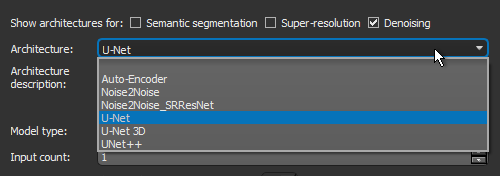
Note A description of each architecture is available in the Architecture description box, along with a link for more detailed information (see also ).
Recommendation Your architecture selection should correspond to your chosen denoising strategy — High-Noise/Low-Noise, High-Noise/HIgh-Noise, or Noise-to-Noise (see Denoising Strategies).
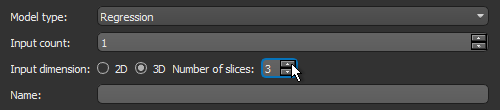
- Choose Regression in the Model type drop-down menu.
- Enter the required number of inputs in the Input count box.
For example, when you are working with data from simultaneous image acquisition systems you might want to select each modality as an input.
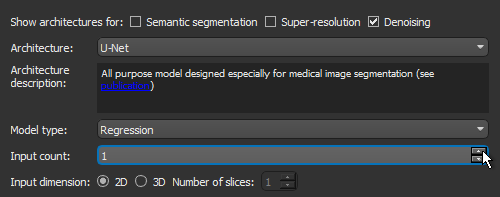
Note In most cases, denoising strategies require an Input count of 1.
- Choose an Input dimension as follows:
- Choose '2D' if you want limit training to 2D, i.e. slice-by-slice.
- Choose '3D' and then a number equal to or greater than '3' to train in 3D, in which case multiple slices of the input dataset will be considered.
- Enter a name and description for the new model, as required.
- Edit the default parameters of the selected architecture, optional.
Note Refer to Editable Parameters for Deep Learning Architectures for information about the settings available in the Model Generator dialog.
- Click Generate.
After processing is complete, a confirmation message appears.
- Close the Model Generator dialog.
- Select your new model in the Model list.
Information about the loaded model appears in the dialog (see Details), while a graph view of the data flow is available on the Model Editing panel (see Model Editing Panel).
- Continue to the topic Training Denoising Models to learn how to train your new model for denoising.
You can start training a model for denoising after you have prepared your training input(s) and output(s), as well as any required masks (see Prerequisites).
- Open the Deep Learning Tool, if it is not already onscreen.
To open the Deep Learning Tool, choose Artificial Intelligence > Deep Learning Tool on the menu bar.
- Do one of the following, as required:
- Generate a new model for denoising (see Generating Models for Denoising).
- Select a model from the Model list that contains the required architecture, number of inputs, and input dimension.
- Import a model from Keras (see Keras models that your import into Dragonfly's Deep Learning Tool must meet the following requirements:).
- Select the required model from the Model list and then click the Load button, if the model is not already loaded.
Information about the model appears in the Model information box (see Details).
- Click the Go to Editing button to edit the architecture of the selected model, if required (see Model Editing Panel).
Note In most cases, you should be able to train a denoising model supplied with the Deep Learning Tool as is, without making changes to its architecture.
- Click the Go to Training button at the bottom of the dialog.
The Model Training panel appears (see Model Training Panel).
- Do the following on the Inputs tab for each set of training data that you want to train the model with:
- Choose your input dataset in the Input drop-down menu.
Note If you chose to train your model in 3D, then additional options will appear for the input, as shown below. See Configuring Multi-Slice Inputs for information about selecting reference slices and spacing values.
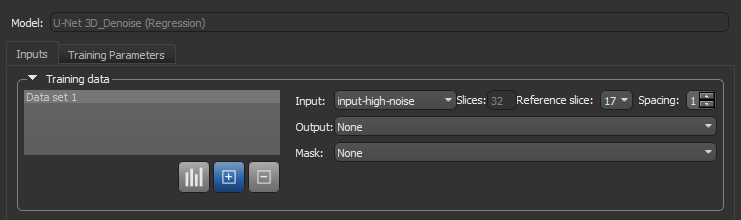
Note If your model requires multiple inputs, select the additional input(s), as required.
- Choose your output dataset in the Output drop-down menu.
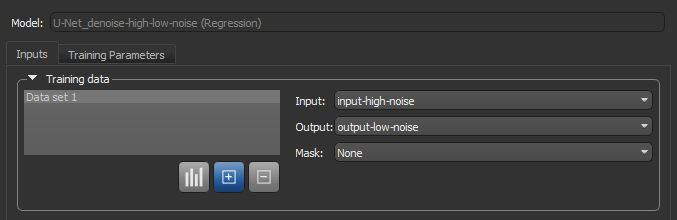
- Choose a mask in the Mask drop-down menu, optional (see Applying Masks).
Note If you are training with multiple training sets, click the Add New
 button and then choose the required input(s), output, and mask for the additional item(s).
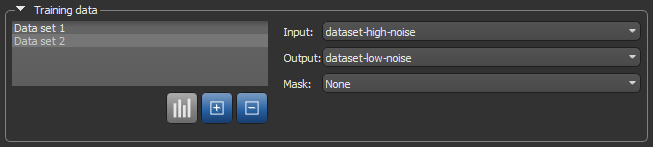
- Choose your input dataset in the Input drop-down menu.
- Do the following, as required.
- Adjust the data augmentation settings, if required (see Data Augmentation Settings).
In most cases, you can deselect Generate additional training data by augmentation.
- Adjust the validation settings, if required (see Validation Settings).
- Adjust the data augmentation settings, if required (see Data Augmentation Settings).
- Click the Training Parameters tab and then choose the required settings.
In most cases, you should increase the Patch size as much as possible. In addition, the MeanSquareError loss function usually provides good results.
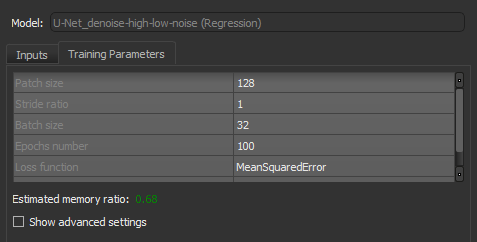
See Basic Settings for information about choosing the patch size, stride ration, batch size, epochs number, loss function, and optimization algorithm.
Note You should monitor the estimated memory ratio when you choose the training parameter settings. The ratio should not exceed 1.00 (see Estimated Memory Ratio).
- If required, check the Show advanced settings option and then choose the advanced training parameters (see Advanced Settings).
You should note that this step is optional and that these settings can be adjusted after you have evaluated the initial training results.
- Click the Train button.
You can monitor the progress of training in the Training dialog, which is shown below.

During training, the quantities 'loss' and 'val_loss' should decrease. You should continue to train until 'val_loss' stops decreasing. You can also select any of the other available metrics to monitor training progress.
Note You can also click the List tab and then review the precise values for each epoch.
Note Refer to the topic Enabling Visual Feedback and Checkpoint Caches for information about visual feedback and checkpoint caches.
- Do the following to export the training results, if required.
- Click the Export button on the Graph tab to export a screen capture of the graph.
- Click the Export button on the List tab to export the results in the comma-separated values (*.CSV extension) file format.
- Close the Training dialog.
- Preview the results of applying the trained model to the input dataset or to the source high-noise dataset to evaluate the model, recommended (see Previewing Training Results).
Note The measure of good denoising is how well detail is preserved while noise is removed.
- If the results are not satisfactory, you should consider doing one or more of the following and then retraining the model:
- Add additional training data.
- Adjust the data augmentation settings (see Data Augmentation Settings).
- Adjust the training parameter settings (see Basic Settings and Advanced Settings).
Note If your results continue to be unsatisfactory, you might consider choosing another architecture.
- When the model is trained satisfactorily, click the Save button to save your denoising model.
- Process the original dataset or similar datasets, as required (see Applying Deep Models).